Showing posts with label Quilts. Show all posts

Tips for Buying Fabric

3.14.2012

Pin It

I got an email this morning from a reader asking about where I buy fabric. Locally or online? I thought I would answer it here in case others find it helpful!

Local Fabric Shopping
If you are looking for fabric from a certain designer (like Amy Butler) go to their website and search for local retailers. On the Amy Butler site there is a tab called "Where to Buy" and then leads you to online AND local retailers near you. Generally, if you go to an actual shop you'll pay the same as you would per yard as online, but there's no shipping.

Online Fabric Shopping
I predominantly shop online, especially if I am looking for a specific designer fabric. Once I know a certain line of fabric I want I check eBay and Etsy. They seem to have better prices than bigger online stores.


Saving Money
1. The thing to remember about Modern quilting is that there is a lot of negative space. I splurge on designer fabrics that I love and then purchase really inexpensive white fabric for the negative space. It seems to make the financial blow a bit easier!

2. Plan ahead. In getting ready to make the tutorial for my Gracie Quilt I knew I needed under 20 strips of patterned fabric so I was able to buy a half a jelly roll on Etsy for cheap. Find a pattern, commit to making it and THEN purchase the designer fabric amount you need.

SHOP RECOMMENDATION: The Intrepid Thread. I recently found and fell in love with this Etsy shop because she sells modern, designer fabrics and sells them in bundles where you can choose your own bundles of fabric in the amount you need. Holla!

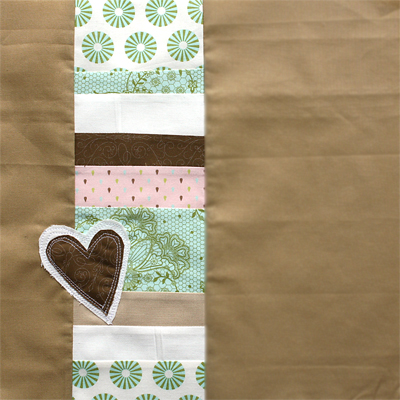
3. Fill with non-designer fabric. Consider purchasing a few fat quarters of bold statement fabric from a designer and then taking it to your local fabric shop and matching smaller scale prints and solids.  Recently I purchased fabric from the Modern Meadow line by Joel Dewberry for this quilt. I got a bundle of a few choice Fat Quarters online and then when it arrived I took it to my local JoAnn Fabrics and found filler fabrics that matched perfectly and were way less expensive (especially if you rock those coupons!).

in the picture below the top row is the designer fabric.   The bottom row is from Joann Fabrics and was less than $5/yard.  Mix the two sets of fabrics together for a less expensive quilt!

Hope that helps...now go forth and shop!


Pre-Cut Fabrics 101: Jelly Rolls

3.05.2012

Pin It
Okay, many of you asked for more information about Fabric Jelly Rolls. I am more than happy to share. So I thought I would start a series in which I discuss a few of the great pre-cut fabric options. The fabric company MODA first came up with these pre-cut fabric packs named after sweet treats, but others soon followed because pre-cut fabrics are a dream to work with!
 
What it is:
A fabric jelly-roll consists of strips of fabric, each cut to 2.5" wide and 44" long. Generally when you buy Jelly Rolls there is one strip of each fabric in a given line of fabrics.

What they look like:

They are a squatty circle which appear much like a Jelly Roll (hence the cute name!).

Where to buy it:
 Online will have the most options, but many fabric stores are catching on that these pre-cuts are becoming all the rage. They usually have a small selection at Joann Fabrics and other big box craft stores.  Here are some good online resources to try:
 
The Fat Quarter Shop (has the most and best selection, but high priced)
Esty (a lot of fabric sellers on Etsy offer these now)
eBay (if you know exactly what fabric line you want check eBay for some great deals!)

What I suggest when buying:
1. MAKE SURE you double check the amount of strips you will receive. The standard is 40 strips, but some sellers sell in bunches of 20 and sometimes 15 or less.  

2. If you are seeing this fabric line for the first time from looking at a jelly roll, use google to look for a picture of the line as fabric swatches. Sometimes you will be surprised at the color combinations that are unseen from the photographed jelly roll.
 
For example: Here is a picture of the Jelly Roll I purchased to make my Gracie Quilt...
 

 And here's the finished quilt. See the difference? 
There was a strip of fabric from each color pallet of this collection. I chose to use mostly the warm colors, but the image for the jelly roll showed mostly the cool colors in the line.
 
What You Should Know:
DO NOT pre-wash your pre-cut fabrics. It will become a ball of strings and then ironing all those strips? No!  Fabric is generally pre-washed these days and increased fabric quality leads to less shrinking.
   
Why it rocks:
Umm...less cutting!  That's the name of the game, but I particularly LOVE buying solid colors for sashing in my quilts.  For instance, I am about to start making this quilt...

See all of that 2.5" wide white fabric seperating my blocks (called the sashing)? Yeah, I'm, not cutting any of that. Because I bought this...
This is especially helpful, because making very long cuts using a rotary wheel and plastic ruler is hard to cut evenly. But these are all cut for you and make quilting a snap! I bought 5 jelly rolls of plain white like the one shown above.
What you can make:
- the Gracie Quilt via Plucky Momo (tute coming soon)
- Postage Stamp Quilt via P.S. I Quilt
- Fat Quarter Shop Jelly Roll patterns (for sale)
- Summer in the Park quilt by Missouri Quilt Co.
- Jelly Roll Quilts (book) by Pam and Nicky Lintott (I own this)

The Gracie Quilt

2.28.2012

I started this baby quilt almost two years ago...eek! But I have an excellent excuse. In the midst of sewing it my sewing machine broke and I took a few months to research and purchase a new one and then life got busy.

But last Summer our little family took a holiday to North Carolina to visit my friend Jenny Lemmons and her family. Jenny and I used to live close to each other here in Lancaster and we were crafty partners in crime. So when we planned our road trip last Summer I actually packed by sewing machine and three half-finished projects into our car for the trip.
Finally I finished my quilt. Then just a few months later my friend had a gorgeous little girl named Grace. And I knew this quilt was meant for her!
It is the perfect quilt for the perfect girl!

I machine quilted it on my Brother sewing machine with the darning (or free motion) foot.  It went well and I think with more practice I will get much more even with the quilting in the future.


1 Jelly Roll of Midwest Modern by Amy Butler


Would anyone be interested in a tutorial 
of how this quilt was made?

my new best friend

1.17.2012

Kona Jelly Rolls in 'Snow'. Have purchased 4 in the past month...Yeah. Four.

If you don't know what a Jelly Roll is, in terms of fabrics, it is a collection (usually either 20 or 40) strips of fabric cut to 2.5" wide and 40" long. They make life SO much easier, especially if you are quilting in a more modern style with a lot of white space.  I will be using these to make THIS quilt. See the magic of it all?  I don't have to cut any of the white fabric for that entire quilt. Holla!


If you are interested in purchasing, let me save you some time and stress. I spent WAY too long online comparing prices (including shipping costs) and found the best deal here via eBay. I got my fabric crazy fast and it's cut well.

Stay tuned for some delicious quilts with these jelly rolls at work! I have one ready to share very soon!

A New Quilt Beginning . . .

1.10.2012

Planning a new quilt is almost the most fun part of the process! I am making a quilt for my best friend, Emily, who is obsessed with navy blue. Obsessed.

So I went in search of a line of fabric which was heavy on the navy blue. And I found it. Then after a very frustrating stretch of time with the EQ5 Program (dude, it's so ridiculously UN-intuitive) I came up with this plan...which may still shift just a bit when piecing time comes.

That outer fabric is navy with white dots, not solid navy as it looks, but will change if I can find white with navy dots to buy on the cheap. 
 
Fabric is from the Modern Meadow line by Joel Dewberry.
Quilt pattern is my own.

Quilting Bee Blocks

4.21.2011

Here are my final two blocks for my Stitch Six Quilting Bee.

Block for Michelle

Michelle's block was so fun to make and the fabrics are very interesting. I am dying to see the finished project since the blocks are each slightly different.
. . . . . . . . . . . . . . . . . . . . . . . . . . . . . . .

Block for LeeAnn


Isn't this Bento block divine?  And I ADORE these fabrics.  This block will eventually be cut into fours and matched with other block quarters to create new blocks.  Then sashed and quilted.

. . . . . . . . . . . . . . . . . . . . . . . . . . . . . . .


Whew!  I am finished with all the blocks for The STITCH SIX bee!
And it was so much more fun than I even imagined.
I found quilting to be relaxing, yet exciting.  Seeing pieces of a puzzle come together through shapes and angles was truly exhilarating.  I am thinking the stitch Six Bee may have to have a Round 2.

Have you ever been a part of a Quilting Bee? 
Virtual or Face-to-face?

caught up!

4.11.2011

i finally caught up with my bee blocks.
doing this has definately given me "quilting fever".

block for Nichole


Nichole chose very modern fabrics for this wonky star block.
Yes, another wonky star block, but I am totally fine with it.
I feel like each time I get better at it. This was my best so far in size and proportion.

three more bee blocks

4.08.2011

i am almost totally caught up on my quilting bee blocks.
i got two done on wednesday. and another on thursday.

block for Amber


Amber gave us a collection of cute fabrics and free reign. she let us know this quilt was for a baby so we could embroider, applique and cutesy it up.

i went with a very linear, hard lined design and then softened it with this appliqued heart. i left the edges of the heart raw so it would fray slightly when washed.

......................................................

block for Jenny


Jenny gave us three fabrics and the directions for a wonky star block.
Jenny is a friend of mine and I suspect this will be her 4th of July quilt, since she has a goal to make a quilt for each month of the year, celebrating that month's holiday.

so cute!

......................................................


block for Anita
I think I fell in love with this type of block.
i have never done one before and I LOVED it!
the tutorial is by Film in the Fridge. Find it here.

It later gets sewn together into a diamond
kinda like this...

( via Film in the Fridge )

......................................................


More Bee Blocks ahead!

Stitch 6 Bee Blocks

4.06.2011

Remember my walking pneumonia?  Well, it has really kicked my butt.
And my Quilting Bee blocks have suffered.
So this week I am sewing two each night to catch up and redeem myself....okay, it's probably too late for redemption, but at least I can tone down some probable inner loathing of me from the group.

MONDAY

First up, a block for Krista. (10.5" unfinished.)


Krista gave us free reign.  I just went with it, letting pieces come together and I really like the results. Ummm....would you think I might iron a block for snapping a photo?  I guess not. 

.........................................................................................

Next was a block for Jackie.  She sent along the fabrics and only specified that it be a star block and end up to be 12.5" unfinished.  I decided to go with a wonky star, mostly since it was 2AM! I really like the pop of the paisley fabric.


This is the block that made me realize my current presser foot is inaccurate and it ended up 1/2" short of it's goal size.  Eek!  Poor Jackie is going to have to add a fun little white border (I would have, but didn't have enough white fabric left over).

.........................................................................................

TUESDAY

After yesterday's seam issues I broke out the old sewing machine manual and assessed my presser feet.  Good old Brother comes with a "Quilting Foot" which is a funny little foot with an ice skating blade on the underneath and to the right, making it impossible for you to align your fabric incorrectly. I checked it and TA DA!  It worked!

Here is my block for Jessica with a very accurate seam.  Woot.
This block had specific guidelines.
Block tute found here via Piece Meal Quilts.


.........................................................................................

More Quilting Bee adventures as this week unfolds
and I piece and sew my fingers to the bone. 
Okay, maybe that was a bit dramatic!

life among the amish means....

2.24.2011

slowing down for buggies.
learning not to take photos no matter how cute the amish kids on the tire swing are.
and tons of little shops displaying amazing, handmade quilts like this one....


i spotted it in a small quilt shop in bird-in-hand, pa.
it was hanging on a rack, so i asked the nice amish woman if i could take it down and take a picture.
she happily obliged and we chatted for a while as i snapped away
and dreamed of having $700 to purchase this exact quilt. 

a few tidbits of info about traditional amish quilts...
- they are sewn on sewing machines. sometimes pedal and sometimes electric.
- they are made only using pieces of fabric leftover from the clothing the family makes.
- if pink is in the quilt you know the family has a little girls, since adult amish women do not wear pink.
- there is no yellow or orange in amish quilts...those colors are considered vain.
side note: a life without orange? i cringe!
- although the quilt top is pieced on a machine, the actual quilting of the layers together (using intricate patterns) is done entirely by hand.  yep, every little stitch...hence the $700 price tag.


 isn't it divine?

i would love to know if there is a history of quilting in YOUR area of the country/world?

Handmade Holiday

12.30.2010

Well, I did not get to make very many handmade items for Christmas this year.  The holidays crept up on me and pounced right around the 20th of December.  I am going to use a newish baby as an excuse.  How long is that excuse good for?  She's about 10 weeks old now...can I still use it?

I did manage to make homemade peanut brittle (my very favorite holiday treat).  If you love it and have never made it, try it!  It's SO easy!


And I sewed up this little quilt for Bianca.  No piecing or anything, I just added a layer of batting between the two fabric, machine quilted it in diagonal squares and did an easy, fold over binding.  But I just LOVE how it turned out.  It's very smooshy and cuddly. 


I used a pre-cut blanket pack from this Etsy shop (although, I cut the fabric after I got it to make the blanket smaller).  And just now, when I went to find the shop link, it looks like she's having a year end sale!  15% off with the coupon code in the Shop Announcements.  To find this exact set click on BLANKET BUNDLES.  She's got tons of cute stuff!

Wanna Join my Quilting Bee?

10.07.2010

What is a Virtual Quilting Bee?
(exerpts from the genius blog Quilting Bee Blocks)

The basic Virtual Quilting Bee is made up of 12 people who are each assigned a separate month as their month to be the recipient of the blocks. The bee will run then for a year, with each person taking turns making blocks for for everyone else 11 months, and one month sending fabric out and receiving their own blocks back.  

My Bee is only running for 6 months and therefore only needs six members.  You will be making 2 blocks for each person in the bee.  But otherwise it will run in the same manner.

When it is a month you are just making blocks for someone else: sit back and relax while you wait for their envelope to come in the mail.  When you get the fabric, read the directions the person sent (or posted online somewhere) about what they want their blocks to be. Sew blocks. Mail it back to them.

When it is a month you are sending out fabric: figure out what kind of blocks you want everyone to make you. select fabric (aka stress over fabric selection). print out or post online directions/inspirations for your blocks. mail out your fabrics to your bee members. wait for finished blocks to start arriving in the mail back to you! 
 
Check out the STITCH SIX Bee group on Flickr here...
 
Please be aware, that blocks for this group should not exceed a beginner/intermediate skill level. I want Modern fabrics and cool block designs for this bee.
 
Wanna join?  PM me via FLICKR. 
Spots are first come first serve, so hurry!
 

EQ5 Review - Step 2 - Scanning Fabrics

9.27.2010

On Saturday we headed to the Joann Fabrics Superstore in Harrisburg, PA.
We went with a mission...
choose the fabric for Baby Ahern's quilt.

After two girls I feel very "Pinked Out".
So we chose this...


Floral and feminine, but with a color pallet of
light blue, orange, dark orange, white and cream.

Next, to scan the fabrics and then plug them into the EQ5 program to see how they look.  I'm not gunna lie, this step was a NIGHTMARE.  Again, no clear instructions in the help menu made this task extremely difficult.  It took me a solid hour to figure it out and I am very computer savvy.  Once I got it in, I am still a bit disappointed.  I know this quilt will look a bit different than shown, since the fabrics you plug in only show a small portion of the pattern. 

However, it was nice to see them put in and realize I wanted a smaller outside border and a larger inner white border.  Changing the sizes in this program was a cinch!  And I now see exactly what it will look like with my border adjustments.  I turned it on its side so you could see a larger view.


EQ5 Review - Step 01 - Planning Your Quilt

9.24.2010

Alright, as mentioned before I am using this program to design your own quilt in my efforts to make a quilt for our coming Baby Ahern.

I promised a full review and here is part one.

I installed this program and opened a new quilt, all ready for action.  However, you are staring a totally foreign screen.  Luckily, there are a series of included Video Tutorials...right?  I watched more than a few and was still completely perplexed on how to even get started with a project. 

I probably sat for an hour before any sort of real progress was made and that was only accomplished by serious trial and error and reading and re-reading various Help topics.  So, my first issue is that the program is not very user friendly.  There is a newer version, EQ7, and I can only hope the directions, videos and help topics are much more detailed and helpful.

Now we're at the part where I have got the knack of it.  You can actually scan in fabrics you plan to use and see exactly how your quilt will look, but I am not in possession of my fabric yet, so I chose to simply color block this quilt and each color would represent a different patterned fabric (with white always being plain white fabric).  I was able to get just what I wanted.  I could easily adjust the block sizes, colors, widths of borders, etc.  As you make adjustments you can always see what the quilt's finished dimensions will be....awesome feature.

So here's what my simple quilt looks like in the program...


Next, comes the very best part.
The yardage estimates.   Woot!


Once your quilt is designed you can see the yardage estimates for the total quilt, broken down by each fabric.  Now, I made a mistake and created white my blocks using a color that was not actually white, so I will have to combine my yardage estimates for the three different whites I used by accident.  But that was my bad, not the program's issue.

It's good to note that the yardage estimates provided by the program include a little extra so you don't run out.  So it's safe to exactly follow their guidelines.  YAY! 

Step number two is heading to the JoAnns Superstore in Harrisburg and choosing my fabric.  I'll be sure to keep you updated.